How do I set up a Raspberry Pi if I don’t have a monitor/keyboard/mouse?

Over the last couple of years I’ve been playing with the Raspberry Pi set of single board computers fairly heavily. In that time I’ve found some great uses for these devices, but sometimes it’s just more convenient to plug one into the wall and start configuring it without having to break out a monitor and keyboard. This is especially true for projects like Pi-hole where the end configuration will run headless (I literally have mine plugged into a USB port on my router for power).

To set this up we’re going to enable ssh and wi-fi on the sdcard before we ever boot the Raspberry Pi. It’s a simple process, we just need to create two files in the root of the boot partition of an sdcard that is formatted and ready to boot. If you don’t want to connect wi-fi you can just plug in an ethernet cable (assuming your Pi has an ethernet port), and skip the wireless setup portion.

The first file is an empty file names ‘ssh’ with no file extension. This tells the OS during boot that you want ssh enabled.

The second file is named wpa_supplicant.conf (just a simple text file with .conf as the extension rather than .txt), that contains the information needed to allow the Pi to automatically connect to the specified wireless network. In this example we’re going to connect to a wi-fi network with the SSID ‘testNetwork’ and the password ‘Passw0rd’. To do this we need to put this text into the wpa_supplicant.conf file:

country=US
ctrl_interface=DIR=/var/run/wpa_supplicant GROUP=netdev
update_config=1
network={
	ssid="testNetwork"
	psk="Passw0rd"
	key_mgmt=WPA-PSK
}

Save that file, and then drop both files into the root of the sdcard. That’s it, once booted your Pi should automatically connect to your wi-fi with ssh enabled.

You can set the wireless country with that first line in the wpa_supplicant.conf file. I include this because the project is based in the UK and I’m in the US. If you’re in a different country you can set this properly using the standard two letter abbreviation for your country.

All your Wi-Fi are pwned: Pwnagotchi project notes.

A while back I started playing with the Pwnagotchi which is basically an automated wi-fi handshake capture tool which can be configured to automatically upload captured handshakes to various online cracking tools. It’s powered by an AI that learns to capture wi-fi handshakes better over time, and can learn to cooperate with other pwnagotchi units to more efficiently capture wi-fi handshakes.

The good: for pentesting this thing is awesome. It’s an automated way to collect pcap files for possible decrypting that is about the size of a large pack of gum.

The bad: if you have a weak WPA password, it makes a usually technically complicated task into a trivial task for someone to own your wi-fi, and they can be built for as little as $10.

I did this project on hard mode, working from a Windows 10 computer and an iPhone, and I want to share some of my notes.

The Build

IMG_3982

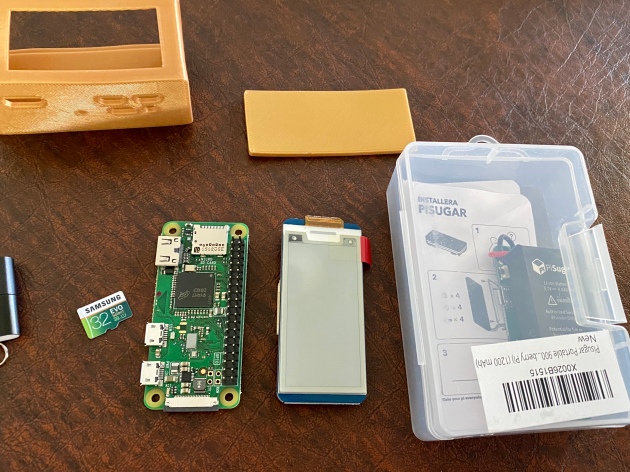
There are a number of different ways that the Pwnagotchi can be built. For this project I chose the Raspberry Pi Zero w (pi0w), Waveshare v2 eInk display, and PiSugar 1200mAh battery hat (the featured pic for this post is my actual components just prior to the build). This is a common configuration and I chose it primarily because I wanted to see how easy this was to set up following the documentation from the project (which needs work).

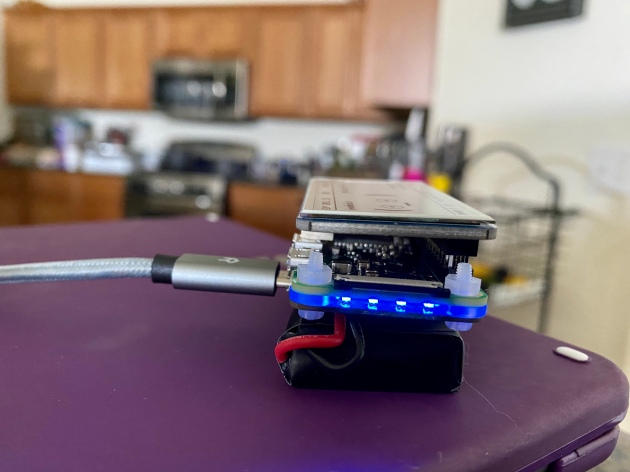
IMG_3997

The four blue LEDs you see in this pic are the PiSugar’s battery indicator. In my testing I’m getting about 4.5 hours of run time on the 1200mAh PiSugar, so each one of those lights is roughly equivalent to an hour of runtime.

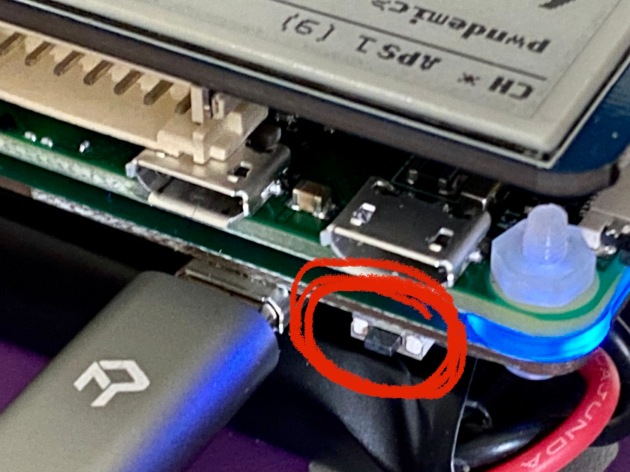
Because the PiSugar is connected via spring pins, this means that you can’t easily turn off the Pwnagotchi, unless you do some digging because the PiSugar has nothing with a capital nothing in the way of documentation. There is a physical button that allows you to reboot, power or, or power off the pi0w when the PiSugar is attached. It’s tiny, and you will probably miss it.

IMG_3998

That is the button. Press it once to turn on the pi0w, again while running to hard reboot the pi0w, and double click it to hard power off the pi0w. Unfortunately the PiSugar1 does not support I2C communication so there is no way to monitor the battery life from the pi0w (unlike the USB-Lite battery hat). This means that when you use the button on the PiSugar it’s a hard reset or hard shutdown, which can lead to issues with file or even sdcard corruption. The best solution is to use the Pwnagotchi’s web interface to power down the unit (or do it via commandline) and then use the PiSugar’s button to start it back up.

Because the initial boot of the Pwnagotchi involves a one time generation of an RSA key, I turned the battery off before inserting the sdcard and powered the unit via the power port (the USB port on the right in the pic above) for initial boot. This process can take a half an hour or more once the boot process is complete, but with a good sdcard can be considerably faster.

Notes:

  • As with all Pi projects, SDCards matter. Better is better. The sdcard is the heart of your project and its quality and speed will have major impact on your experience. The cheap noname 16GB card I had in my box of parts took more than 30 minutes to boot when I tested it with the pi0w.
  • Make sure when connecting the pi0w to a computer that 1) your USB cable supports data, and 2) that you select the actual data port, not the power port (in the picture above that is the port above the button, you want the one on the left).
  • eInk displays come in wide variety. The Waveshare was relatively inexpensive at $22 on Amazon, and there are many 3D printed case designs available for different configurations.
  • The battery hat was probably my most contentious part selection. I went with the PiSugar only because it was readily available. The UPS-Lite battery hat has built in support for displaying the battery level on the display of the Pwnagotchi. If I were doing this again I’d probably go that route.
  • The pi0w does not have a real time clock, so if I make changes to this in the future, it will likely be to add that. There are plenty of tutorials online, and it’ll fit between the display and the pi0w neatly.

Configuration

Setting up the config.toml file is fairly straightforward, the project docs are pretty easy to follow for that. If you’re doing this on a Windows machine just know that the config.toml file needs to go in the root of the sdcard, not the /root folder.

This is where the project docs start to fall down. To be fair, there are a lot of possible scenarios so it’s a hard thing to get right for everybody, and I’d be comfortable saying that it is likely that the majority of people attempting this project are doing so from a Linux background. I am fairly comfortable with Linux, but I generally work on Windows machines.

The first issue I ran into was on initial boot. My SSH attempt was being rejected. This is because the IP you assign is for the adapter of the RNDIS gadget in windows, not the actual pi0w. My network at home is 10.0.0.x/24, and it looks like the Pwnagotchi build is set up to expect this. Both a blessing and a curse, because if you have a device on your network that is using 10.0.0.2 you’re gonna have fun trying to SSH to the Pwnagotchi and have network connection at the same time.

I luckily didn’t, and once I realized the mistake I was making I was able to establish a connection to the pi0w at 10.0.0.2. I then realized that because my actual gateway is 10.0.0.1, and I had assigned something else to my RNDIS adapter, I could communicate with the Pwnagotchi, but it could not communicate with the outside world. Initially I thought “well, I’ll just set up the wi-fi on the pi0w and connect that way,” but because of the nature of the project, the wi-fi on the pi0w is not usable (bettercap is using it to sniff wi-fi handshakes, duh).

My solution was to connect the Pwnagotchi to my iPhone via bluetooth and share the internet from there. It’s not as easy as that sounds. Luckily with Pwnagotchi release 1.5 they’ve dropped the YAML config file for a TOML config file (which is a lot easier to get right), but there also isn’t much in the community forums about the config.toml file and how to set it up (almost everything I found was referencing config.yml). I was eventually able to get it working, here is the section I had to add to the config.toml file to get it working:

main.plugins.bt-tether.enabled = true
main.plugins.bt-tether.devices.ios-phone.enabled = true             
main.plugins.bt-tether.devices.ios-phone.search_order = 1
main.plugins.bt-tether.devices.ios-iphone.mac = "xx:xx:xx:xx:xx:xx"
main.plugins.bt-tether.devices.ios-iphone.ip = "172.20.10.6"
main.plugins.bt-tether.devices.ios-iphone.netmask = 14
main.plugins.bt-tether.devices.ios-iphone.interval = 1
main.plugins.bt-tether.devices.ios-iphone.scantime = 15
main.plugins.bt-tether.devices.ios-iphone.max_tries = 10
main.plugins.bt-tether.devices.ios-iphone.share_internet = true
main.plugins.bt-tether.devices.ios-iphone.priority = 1

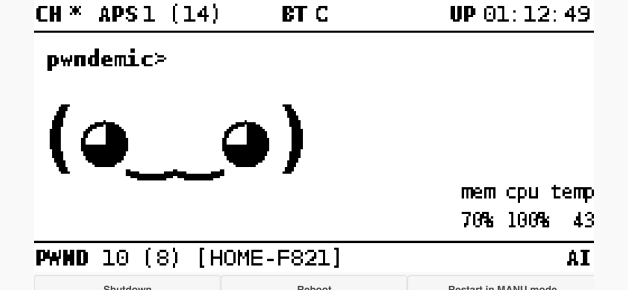
The actual connection took a while. You have to enable your wi-fi hotspot in iOS, and then wait for a connection attempt in the bluetooth settings. It takes a few minutes, but it’ll eventually happen. Once you allow pairing, you just have to follow that process and attempt to connect the bluetooth device in iOS when the Pwnagotchi status is “Looking around” or at least that seems to work for me.

Once it’s connected, it’s time to update the OS with a standard

sudo apt-get update && sudo apt-get upgrade

command. Because we are using a battery, we’ll need to power that off before connecting the data port so that the pi0w is running off of the USB port power rather than the battery. The pi0w is a tiny single board computer and updates can take a long time. Losing power during an update is a good way to corrupt your disk.

Once the OS update is complete, reboot and then enable the webcfg plugin via the web interface so that you can finish configuration there. It’s a lot easier than trying to do it via commandline.

Notes:

  • The Pwnagotchi will initially come up with the IP 10.0.0.2, when you assign an IP to the RNDIS adapter, your assigning that IP on the local computer. This is the gateway for the Pwnagotchi, so if you don’t assign 10.0.0.1 to the RNDIS adapter you will have no internet connection. In my case, I couldn’t because 10.0.0.1 is my actual gateway.
  • main.plugins.bt-tether.devices.ios-iphone.mac = “xx:xx:xx:xx:xx:xx” is the bluetooth MAC of your iPhone, just replace the xx bit with your actual MAC.
  • Make sure once you’re done with configuration and updating that you backup your sdcard using dd or Win32DiskImager so that if your sdcard dies you can make another that is ready to run as soon as it is powered up.

IMG_3987

Conclusion

This was a really fun project that is a neat way to learn about AI and Deep Reinforced Learning while having fun and (for me at least) reliving some of the excitement of a good old fashioned wardriving session.


end.jpg

PowerShell Function: Get-LocalWeather

Just a quick note here, you NEED to read the Comment Based Help for this function (especially if you are querying sites outside the US).

    ##--------------------------------------------------------------------------
    ##  FUNCTION.......:  Get-LocalWeather
    ##  PURPOSE........:  Queries the nearest airport for local weather 
    ##                    conditions.
    ##  REQUIREMENTS...:  Internet connection
    ##  NOTES..........:  
    ##--------------------------------------------------------------------------
    Function Get-LocalWeather {
        ##----------------------------------------------------------------------
        ##  Comment Based Help for this function.
        ##----------------------------------------------------------------------

        <#
        .SYNOPSIS
         Queries the nearest airport for local weather conditions.
        .DESCRIPTION
         This function uses webservicex.com to query data from airports and 
         weather observatories for local weather conditions.
        .PARAMETER Site
         Name of the Airport or weather observatory to query.

         ALIAS:  -s
        .PARAMETER ListAll
         This optional switch returns a list of all available airports and 
         weather observatories available in the selected country (default is the
         United States).

         ALIAS:  -l
        .PARAMETER TempF
         This optional switch returns only the temperature (in Fahrenheit) for 
         the specified location.

         ALIAS:  -tf
        .PARAMETER TempC
         This optional switch returns only the temperature (in Celsius) for the
         specified location.

         ALIAS:  -tc
        .Parameter Humidity
         This optional switch returns only the relative humidity for the 
         specified location.

         ALIAS:  -h
        .PARAMETER CountryName
         This optional parameter changes the Country queried (the default is the
         United States). 

         NOTE:
         If you are querying a data source outside the US, you MUST use this 
         parameter.

         ALIAS:  -c
        .EXAMPLE
         C:\PS>Get-LocalWeather "Knoxville"

         This will return the current weather conditions at the Knoxville 
         Airport.

        .EXAMPLE
         C:\PS>"Knoxville" | Get-LocalWeather

         This will return the current weather conditions at the Knoxville 
         Airport using pipelining.

        .EXAMPLE
         C:\PS>Get-LocalWeather -l | More

         This Example will display a list of all available Airports / Weather 
         Observatories in the US (I piped it to More because there are many).

        .EXAMPLE
         C:\PS>Get-LocalWeather -l -c "Canada" | More

         This Example will display a list of all available Airports / Weather 
         Observatories in Canada (I piped it to More because there are many).

        .EXAMPLE 
         C:\PS>Get-LocalWeather "Wyton" -c "United Kingdom"

         This example will return weather data for the Wyton airport in the UK.

        .NOTES
         NAME......:  Get-LocalWeather
         AUTHOR....:  Joe Glessner
         LAST EDIT.:  25JAN13
         CREATED...:  03DEC12
        .LINK
         https://joeit.wordpress.com/
        #>

        ##----------------------------------------------------------------------
        ##  Function Parameters.
        ##----------------------------------------------------------------------
        Param([Parameter(Mandatory = $False,
            ValueFromPipeLine = $True,
            Position = 0)]
            [Alias('s')]
            [String]$Site,
            [Parameter(Mandatory = $False)]
            [Alias('c')]
            [String]$CountryName,
            [Parameter(Mandatory = $False)]
            [Alias('l')]
            [Switch]$ListAll,
            [Parameter(Mandatory = $False)]
            [Alias('tf')]
            [Switch]$TempF,
            [Parameter(Mandatory = $False)]
            [Alias('tc')]
            [Switch]$TempC,
            [Parameter(Mandatory = $False)]
            [Alias('h')]
            [Switch]$Humidity
        )#END: Param

        Begin {
            $URL = 'http://www.webservicex.com/globalweather.asmx?WSDL'
            $weather = New-WebServiceProxy -Uri $URL
            If ($CountryName) {
                $Co = $CountryName
            } #END: If ($CountryName)
            Else {
                $Co = 'United States'
            } #END: Else
            Write-Verbose "$Site"
            Write-Verbose "$Co"
        } #END: Begin
        Process {
            If ($ListAll) {
                $List = `
                ([xml]$weather.GetCitiesByCountry($Co)).NewDataSet.Table | 
                Select-Object -ExpandProperty City
                $List
            } #END: If ($ListAll)
            If (!(($Site) -or ($ListAll))) {
                Write-Warning "You must enter the exact location name for your"
                Write-Warning "desired Airport/observatory."
                Write-Warning ""
                Write-Warning "Use the -l switch to get a list of valid site"
                Write-Warning "names."
            } #END: If (!($Site))
            Else {
                Write-Verbose "If you see a Type conversion error here, either"
                Write-Verbose "your query was incorrect, or there is no data"
                Write-Verbose "for the site you queried."
                $Data = ([xml]$weather.GetWeather($Site,$Co)).CurrentWeather  
            } #END: Else
            If ($TempF) {
                $Temp = ($Data.Temperature -split '\(')[0]
                $Temp.TrimStart()
                Break;
            } #END: ($TempF)
            If ($TempC) {
                $Temp = ($Data.Temperature -split '[\(\)]')[1]
                $Temp.TrimStart()
                Break;
            } #END: If ($TempC)
            If ($Humidity) {
                $Data.RelativeHumidity.TrimStart()
                Break;
            } #END: If ($Humidity)
            ElseIf ($Site) {
                $Data
            } #END: If ($Site)
        }#END: Process
    } #END: Function Get-LocalWeather

end.jpg

PowerShell Function: Get-ADLogin

    ##--------------------------------------------------------------------------
    ##  FUNCTION.......:  Get-ADLogin
    ##  PURPOSE........:  Returns the specified user's SAM Account Name.
    ##  REQUIREMENTS...:  Active Directory
    ##  NOTES..........:  
    ##--------------------------------------------------------------------------
    Function Get-ADLogin {
        ##----------------------------------------------------------------------
        ##  Comment Based Help for this function.
        ##----------------------------------------------------------------------

        <#
        .SYNOPSIS
         Returns the specified user's SAM account Name.
        .DESCRIPTION
         This function accepts the user's Display Name, and returns the SAM 
         Account name for the user. Defaults to search the "Users" OU.
        .PARAMETER Usr
         The user's Active Directory Display Name.
        .PARAMETER All
         This optional switch will return the SAM account name for the first
         1000 users in the "Users" OU in Active Directory.
        .EXAMPLE
         C:\PS>Get-ADLogin "Test User"

         This will return the SAM account name for the user account with a 
         Display Name of "Test User".

        .EXAMPLE
         C:\PS>"Test User" | Get-ADLogin

         This example does the same thing as Example 1, only using pipelining.

        .NOTES
         NAME......:  Get-ADLogin
         AUTHOR....:  Joe Glessner
         LAST EDIT.:  03DEC12
         CREATED...:  11APR11
        .LINK
         https://joeit.wordpress.com/
        #>

        ##----------------------------------------------------------------------
        ##  Function Parameters.
        ##----------------------------------------------------------------------
        Param([Parameter(Mandatory = $False,
            ValueFromPipeLine = $True,
            Position = 0)]
            [Alias('u')]
            [String]$Usr,
            [Parameter(Mandatory = $False,
                ValueFromPipeLine = $True,
                Position = 1)]
            [Switch]$All
        )#END: Param

        $filter = "(&(objectCategory=person)(objectClass=user)(name=$Usr))"
        $root = New-Object `
            System.DirectoryServices.DirectoryEntry("LDAP://RootDSE")
        If ($All) {
            $searcher = New-Object System.DirectoryServices.DirectorySearcher
        }
        Else {
            $searcher = New-Object `
            System.DirectoryServices.DirectorySearcher $filter
        }
        $SearchRoot = $root.defaultNamingContext
        $searcher.SearchRoot = "LDAP://CN=Users,$SearchRoot"
        $searcher.SearchScope = 'SubTree'
        $searcher.SizeLimit = 0
        $searcher.PageSize = 1000
        $searcher.FindAll() | ForEach-Object {
            $account = $_.GetDirectoryEntry()
            $info = $account.SamAccountName[0]
            $info
        }#END: ForEach-Object
    }#END: Function Get-ADLogin

Downgrade from iOS 6 to iOS 5.1.1 (link to iOS 5.1.1 for the iPhone 4s included)

So for many people the… inconsistencies of the new iOS maps application in iOS6 is a deal breaker. Not so much for me, but I know some people who travel for work a lot and are furious about it.

Apple doesn’t want you downgrading to 5.1.1 because of the removal of Google Maps and the YouTube app.

That’s not to say it can’t be done.

First you’ll need and iOS 5.1.1 ipsw file, which you can get directly from Apple (for now) here (that’s for the iPhone 4s, you’ll need to hunt around for links for other devices).

Backup your phone in iTunes (or with iCloud, which ever you can get to successfully restore – with iTunes you can get software that will let you recover data and pictures from the resulting backup file even if iTunes tells you it is corrupt).

Select Restore in iTunes while holding the Shift key on Windows, or Option on a Mac.

When it prompts you for the file to restore from, select the one you downloaded above, and wait for the restore to complete.

I’ll use a safari link to maps.google.com until google releases an iOS maps app, but then I never used maps on my phone all that much.

iOS6: Configuring Do Not Disturb without a Mac computer

Of all the features that Apple has added to iOS (other than multiple email accounts), Do Not Disturb was the top of my most wanted list. I’ve hunted through every iOS update or rumor post since iOS3 looking for it. Finally with iOS6, there it was.

As soon as I got iOS6 installed, I started trying to figure out how to configure it, looking at the limitations. I am disappointed. I have two main complaints with DND as implemented in iOS6:

  1. Scheduling is weak. I want to be able to schedule it like I can schedule alarms; different times on different days. During the week 10pm – 7am is fine, but on the weekends I want 11pm – 10am.
  2. Contact groups.

Now I am well aware that contact groups is not really a part of DND specifically, but how they are implemented definitely affects its usefulness.

I guess part of my issue is that I don’t buy into the whole “Cult of Mac” thing, and do not own every Apple product ever made. I have an HP laptop, I will be buying a Microsoft Surface tablet (though I do own an original iPad), about the only thing I actually use that is made by Apple is my iPhone.

This makes managing contact groups kind of a pain.

I use Gmail to manage my contacts, which cannot create or edit contact groups on the iPhone.

By default the only options you have for groups that can bypass DND is Everyone, No One, or Favorites (and All Contacts if you have iCloud enabled for Contacts, but what is the point of that?).

I don’t want to add people who might need to bypass DND to my favorites.

I’ve found plenty of information on how to set up contact groups if you have a Mac computer, but as far as I can determine if you don’t have a Mac computer, you’re going to have to use iCloud if you want contact groups.

Now if you only want to set up a list of people who can bypass DND, not a huge issue.

When you have hundreds of contacts, stored in Gmail, in Exchange, and maybe Yahoo or Hotmail too (yes there are people who use Hotmail), managing your contacts gets tricky.

I don’t trust Apple with my data. Maybe that’s because I’ve yet to be able to successfully restore from an iTunes backup, no matter what I try. Every single time I have upgraded iOS (major versions anyway), I have had iTunes tell me that the backup was corrupt or unreadable.

After the first time way back on iOS3 I moved all of my contacts to Gmail, and washed my hands of letting Apple shepherd any of my data. Luckily since iOS5, I’ve been able to restore from iCloud backups (suck it iTunes). I have no complaints with iCloud as of yet, but I still don’t trust it.

In my specific instance, it looks like I have no choice and am going to have to use it for my contacts. I will be exporting my contacts to VCard file weekly.
I just want to point out that it is possible to only use iCloud for a single group of contacts if you want to create one for bypassing Do Not Disturb. Maybe Apple will fix this at some point, but I kinda doubt it.

To get Do Not Disturb working the way you want it to, you have three basic tasks:

  1. Configure iCloud Contact Groups.
  2. Enable iCloud to sync contact groups on your iPhone.
  3. Configure Do Not Disturb.

Configuring iCloud Contact Groups

First, you need to export whatever contacts you want to use for a group to bypass DND, we’ll call it ‘Bypass’. I had all of my contacts in Gmail, so I just selected the ones I wanted, and exported them all to a single VCard file.

Now you’ll need to sign into iCloud and create a contact group called ‘Bypass’ (or whatever you want to name yours), and then import the contacts you want in that group:

Click to enlarge

  1. Once you are signed into iCloud go to Contacts, and click this red bookmark looking thing to show groups (it’s on the other ‘page’ when you first get to contacts).
  2. Click this to add a new group.
  3. Rename the group, and then highlight it to ensure that you import into that group.
  4. Click the gear to expose options.
  5. Click here to import the contacts you want in this group.
  6. To enable iCloud to sync contacts go to Settings > iCloud > Contacts (swipe to ‘On’).

Configuring Do Not Disturb

In my opinion Apple kinda dropped the ball on this one. Usually Apple’s UI is well thought out to the point of being so intuitive that someone who has never used an iOS device can usually figure out what they need to do to get something working, but Do Not Disturb (like several other things) is not exactly intuitive to configure.

Go to Settings > Notifications > Do Not Disturb.

Click to enlarge

Click to enlarge

Now that we’ve got the contact group we want to use configured in iCloud, we can select that in the Notification settings.

Click to enlarge

You can see here how I’ve configured my Do Not Disturb notifications:

Click to enlarge

One thing I would point out is that if you schedule DND you can still turn it on manually as shown in this screen shot. Also notice that there is a crescent moon icon that appears in the notification bar when DND is active:

Click to enlarge

It works pretty well, but I’d still like to see come changes to this in the next iOS update. Especially the ability to schedule DND a bit more granularly.

How do I Change the product key in Windows 8?

Official mascot of Windows 8

I’ll just get it out of the way right up front: I hate the Windows 8 UI.

It might make sense on a consumer device, but not for an enterprise. There is no way I’m deploying this to my users. It’ll be two months of help desk tickets that look like this: I can’t find my email. I can find the internet. What’s a Metro?

Not happening. Why Microsoft thought it would be a good idea to throw away 20 years of training their users how to use their flagship product, I’ll never know. I just hope whoever is responsible is dealt with appropriately. By ‘appropriately’ I mean taken out back and shot.

When someone who has been administering Windows machines since Windows 98 is sitting there asking how to actually install Windows Updates, your UI has gone terribly awry.

In order to actually install updates, you have to activate the OS. Apparently to really do anything you have to activate the OS. Ok, I can see that. We use Windows 7 Enterprise here, and I was kinda hoping that Microsoft had realized by now that it is a terrible idea to force the Windows 8 UI on enterprise customers, and had disabled it in Windows 8 Enterprise. No such luck.

Also, they expect enterprise customers will be using KMS servers to activate. We do not. Why? Well I can’t get it working correctly. Microsoft says that it is working. It says that it is working. Clients cannot activate using it. I have a ticket open with Microsoft.

In the meantime, I will just use MAK keys. Except I can’t find a way to get the damn MAK key into Windows 8 Enterprise. Just because I’m not forcing it on giving it to users doesn’t mean I’m not evaluating it.

Apparently they expect you to use KMS to activate MAK keys by opening an elevated command prompt, and typing this command:

slmgr.vbs -ipk “Enter Key Here”

Well that’s all well and good, but I don’t need more KMS “servers” that don’t serve keys.

The easy way is to use a Run Command:

slui 3

That was added to Windows 7 at some point, and works as well there as it does on Windows 8.

I hope that saves someone the time it took me to figure it out.

The magic email

This is just me ranting, if you’d rather skip it feel free, I won’t hold it against you.

Like any other Tuesday, I’m sitting at my desk, working. I get a call from one of my “VIP” users, telling me about another user having issues with his email. New Guy started on Monday. I have set up an email (let’s call it new.guy@company.com), but have not given him the password, or the link to OWA, or configured Outlook, or his phone to access the email.

Apparently the “VIP” user sent New Guy a test email at 10:20am, which he received on his laptop (say what?), and now he is not getting email sent to him. Well no shit he’s not getting them, no one has asked me to set up his email yet. New Guy is kind of a special case, in that he is going to be a marketing rep for us, but he is a retained consultant, so he isn’t actually an employee. As such, he will not be using any company equipment, he just needs me to configure his @company.com email address on his personal laptop.

So I ask the “VIP” user how he could have gotten the test email since he doesn’t have anything other than the actual email address? She doesn’t know. Ok, I’ll be over to configure his email in just a minute.

In retrospect what I should have done was gotten in my car and went fishing.

Like an idiot, I go over to the office where New Guy is working, and let them both know that, barring any unannounced changes in the laws of physics, there is no way that any email sent to his @company.com email address could have possibly made it’s way onto New Guy’s computer, with nothing more than a name to go on.

The “VIP” user just won’t let it go. Swearing that the email was there! It was really for reals on his computer!

I ask to see the email on his computer.

“It disappeared.”

Alllllllllllrighty then! In the words of The Master (Frank, if by some weird coincidence you’re reading this, you’re still the man); PFM is the only explanation for this. Pure. Fucking. Magic.

So, I tell Ms. VIP that I will call the hosting company and have them trace the message, after I set up New Guy’s email.

So I sit down to set up his @company.com email account, and temporarily forgot that I wasn’t dealing with Office 2010 (what everything in our company runs), but Office 2007. For about five minutes I think I’ve just blitzed his personal email account in Outlook. Shit. I knew I should have backed this machine up before touching it.

I ask him who hosts his email (he had previously told me that his “company” didn’t have a mail server).

He responds “I get my email from Microsoft. By way of iPage, and it’s delivered to Outlook. But it comes from Microsoft.

Dammit.

I know how to solve this, lemme just grab my helpdesk uniform real quick:

Sadly I don’t get to play Il Duce at the office.

Suddenly the whole magic email thing becomes clear. The “VIP” user told him “I just sent you a test email,” to which he replied “ok got it.” What she heard was “I am reading your email right now,” but what he actually said was “I am acknowledging what you just said to me.”, and by the time I got there, New Guy was too embarrassed to admit the confusion, and had to stick with his “I had the email in my personal email account, but it magically disappeared!” story.

Can someone just admit that they made a mistake without trying to blame the technology, just one fucking time? Please?

I can prove that your story is complete bullshit. I will prove that your story is complete bullshit.

So while contemplating the violent murder of New Guy, I flash on the fact that this is Outlook 2007, the profile is there, I just have to set it to ask on launch which profile to use. Fixed. Email working.

I’m getting out while the getting is good, and then New Guy says “hey you know while I’ve got you here, I can’t change my password, it won’t let me.”

He’s talking about his user account password, not his email (which he still doesn’t have a password for). Ok, no big deal, whoever last worked on his computer set the ‘user cannot change password’ flag on the account, let me just uncheck that…

The account isn’t listed in Local Users and Groups. Weird. Win+R > CMD > {ENTER} > net localgroup administrators (clickity).

“Hmmm, it appears that you’re logged on with a domain account from the XYZ domain. Is this a client you worked for at one point?”

“Oh yeah, I bought the laptop from them when I finished the job 9 months ago.”

Clickity, clickity.

“It doesn’t look like there are any other local accounts on this machine. Do you still remote into their network for something?”

“No I used to have a remote access thingy, but I gave that back when I finished the job 9 months ago. I was on their network about a month ago though when I had them fix my email. They’re in Texas.”

“Well that’s why you can’t change the password on your account. It’s a domain account, so you need a connection to their DC to change the password that is stored in AD. If you don’t work for them anymore you’re going to want to get that fixed, eventually the cached credentials will expire, and you won’t be able to log into the account anymore.”

“Oh it’ll be fine.”

“Ok, call me if you need anything else while you’re here.”

Bye bye now.

Which led to a completely absurd call to our email host that started out with “I know this is going to sound completely preposterous, but hear me out…”

Of course, as I knew would happen, the host traced the email, and noted that it was not delivered to any device until 4:45pm (which is when it was finally delivered to the new outlook profile I set up for New Guy).

I really don’t like it when I have to waste not only my time, but the time of someone else because a “VIP” user will not accept that I have been doing this for 15+ years and when I say something is not possible that is not a guess.

End of rant.

Assigning an IP Address to an APC Network Management Card without having the APC software.

I work for a company that does Electrical construction and design. When I took this job I though that would translate into having little things like plenty of power in the server room, well documented wiring, and maybe having everything in the building(s) on UPS units. I should have known better.

Much like most IT Professionals home networks are kinda messy, working for a company full of electricians translates to wiring… issues.

We do have a generator, and we do have a building UPS in the main building. That UPS is 15 years old. The UPS battery had never been replaced when I got here (it basically had a runtime measured in microseconds). Only some outlets are on the UPS circuits. The server room is in another building. That building is on the generator, but there is only one circuit that is on the UPS. That circuit was for the 17 year old Toshiba PBX that was mounted (I kid you not) in a cupboard in the bathroom in that building.

The servers were on UPS units. APC SmartUPS 1500 units. Four of them. That were 6 years old. With batteries that had never been replaced. Desk units that were housed on shelves in the rack. That were at approximately 150% of draw capacity (when all servers were at peak draw). Unconnected in any way to any of the servers.

This meant that if the power failed (which is does, because this is an older part of town), most of the workstations would go down, and the generator would kick on. Approximately 1/1000000000 of a second before the UPS batteries on the servers and the few workstations on building UPS circuits ran out. Most of the time.

So clearly my first priority was to get the servers on a UPS that was correctly sized for the draw, with fresh batteries. Enter the APC SmartUPS RT 5000 with two battery arrays. This unit will handle all of our current servers, with about 30% extra capacity for expansion. I bought this unit with a Network Management Card so that I could remotely monitor the unit. And then never configured it. I’m not going to make excuses, it was just one of those things where I got busy and forgot.

Until I needed to get access to a UPS in the other building. This got me thinking about the UPS on the servers. So I plugged the NMC into one of the switches, and… nothing.

As it turns out, the NMC in this particular unit will not pull a DHCP lease without intervention through some APC software that ships with the unit. Which I cannot find. Not an insurmountable issue.

Enter the ARP command.

Address resolution protocol (ARP) can be used to configure the NMC. All we need is the MAC address of the NMC.  The MAC address is located on the quality assurance slip that shipped with the NMC, and is also located on a white sticker on the NMC itself.Unfortunately the QA slip is long gone, and the sticker on the NMC with the MAC printed on it is on once of the actual circuit boards of the NMC, now safely concealed inside the UPS.

Now I DO NOT recommend that you do this, but it is possible to remove the NMC with the UP running. If you feel like taking your life in your own hands, you could just unscrew the NMC and pull it out of the UPS without taking the UPS offline. Which is what I did.

Now we just need a computer on the same subnet.

Open up a command prompt and type the following (MAC Address format: xx-xx-xx-xx-xx-xx):

arp -s [IP_ADDRESS_FOR_THE_NMC] [MAC_ADDRESS_OF_THE_NMC]

Hit Enter.

Next, use Ping with a size of 113 bytes to assign the IP address defined by the ARP command.

Use one of the following Ping commands (To clarify, the -l option is the letter L but must be lowercase when executing the command):

Windows command format: ping [IP_ADDRESS_ASSIGNED_ABOVE] -l 113

*NIX command format: ping [IP_ADDRESS_ASSIGNED_ABOVE] -s 113

Now, you can Telnet to the card by typing: telnet [IP_ADDRESS_OF_THE_NMC]

Use “apc” for username and password.

Configure/apply any additional changes.

Log out to save changes.

That’s it, now you can use the web interface of the NMC to make configuration changes or retrieve information from the UPS unit.

All of this could have been avoided had I simply taken 30 minutes to configure the UPS when I installed it, or even taken 5 minutes to document the MAC and put all of the paperwork that came with the UPS in a folder in my file cabinet. Learn from my mistakes, DOCUMENT EVERYTHING.


PowerShell Function: Get-Sysinternals

    ##--------------------------------------------------------------------------
    ##  FUNCTION.......:  Get-Sysinternals
    ##  PURPOSE........:  Downloads or updates the Sysinternal Utilities.
    ##  REQUIREMENTS...:  PowerShell 2.0
    ##  NOTES..........:  
    ##--------------------------------------------------------------------------
    Function Get-Sysinternals {
        <#
        .SYNOPSIS
         Downloads or updates the Sysinternals Utilities. For examples type:
         Get-Help Get-Sysinternals -examples
        .DESCRIPTION
         The Get-Sysinternals Function uses file timestamps to determine if 
         there are updates or (optionally) new utilities available from 
         live.sysinternals.com, if there are they will be downloaded and saved 
         in the specified directory.
         This function will also log all output to whatever directory is 
         specified by the -Path parameter (by default this is 
         "c:\admin\tools\logfile.txt").
        .PARAMETER <Path>
         This optional parameter defines the location of your Sysinternals 
         Utilities, or where they will be saved if none are present. The default
         value is "c:\admin\tools". If you specify a path that does not exist, 
         it will be created. If a trailing slash is used in the path, the 
         operation will fail.
        .PARAMETER <getnew>
         This optional parameter will get any utilities that are available on 
         live.sysinternals.com, which do not exist in the specified directory.
        .EXAMPLE
         C:\PS>Get-Sysinternals
         
         This example will check the directory "c:\admin\tools" for existing 
         Sysinternals utilities and update any with newer verisons.
         
        .EXAMPLE
         C:\PS>Get-Sysinternals c:\sysinternals
         
         This example will do the same thing as Example 1, but using the 
         "c:\sysinternals" folder.
         
        .EXAMPLE
         C:\PS>Get-Sysinternals c:\sysinternals -verbose
         
         This example will do the same thing as Example 2, but will also write 
         verbose output to the console.
         
        .EXAMPLE
         C:\PS>Get-Sysinternals c:\sysinternals -getnew -verbose
         
         This example will do the same thing as Example 3, but will also 
         download any utilities that are available on live.sysinternals.com, 
         but which do not exist in the specified path.
        
        .NOTES
         NAME......:  Get-Sysinternals
         AUTHOR....:  Joe Glessner
         LAST EDIT.:  24MAY12
         CREATED...:  11APR11
        .LINK
         https://joeit.wordpress.com/
        #>
        [CmdletBinding()]
        Param(
            [Parameter(Mandatory=$False, 
                        Position=0,                           
                        ValueFromPipeline=$false,             
                        ValueFromPipelineByPropertyName=$false)]
            [String]$Path = "c:\admin\tools",
            [Switch]$GetNew
        )#END: Param
        $SysIn = "\\live.sysinternals.com\tools"
        If ($PSBoundParameters['Verbose']) {
            net use $SysIn /persistent:no;
            New-PSDrive -Name SYS -PSProvider filesystem -Root $SysIn
        }#END: If ($PSBoundParameters['Verbose'])
        Else {
            Net Use $SysIn /persistent:no | Out-Null;
            New-PSDrive -Name SYS -PSProvider filesystem -Root $SysIn | out-null
        }#END: Else
        If(!(Test-Path -Path $Path -PathType Container)) {
            $null = New-Item -Type Directory -Path $Path -Force
        }#END: If(!(Test-Path...
        $log = join-path $Path "logFile.txt"
        Write-Verbose "Logging to: $log"
        Add-Content -force $log -value "`n`n[$(get-date)]Update started..."
        Get-ChildItem SYS: -recurse | ForEach {
            $fileName = $_.name
            $localFile = join-path $Path $_.name
            $exist = test-path $localFile
            $msgNew = "  ** New utility found: $fileName , downloading..."
            $msgUpdate = "  ** Update found for: $fileName , downloading..."
            $msgNoChange = "    No update for: $fileName"
            If($exist) {
                If($_.lastWriteTime -gt (Get-Item $localFile).lastWriteTime) {
                    Copy-Item $_.fullname $Path -force
                    Write-Verbose $msgUpdate
                    Add-Content -force $log -value $msgUpdate
                 }#END: ($_.lastWriteTime...
                Else {
                    Add-Content $log -force -value $msgNoChange
                    Write-Verbose $msgNoChange
                 }#END: Else
            }#END: If($exist)
            If($GetNew) {
                If(!($exist)) {
                    If($_.extension -eq ".exe") {
                          Write-Verbose $msgNew
                          Add-Content -force $log -value $msgNew
                     }#END: If($_.extension -eq ".exe")
                    Copy-Item $_.fullname $Path -force
                }#END: If(!($exist))
            }#END: If($GetNew)
        }#END: Get-ChildItem SYS: -recurse | ForEach
        Write-Verbose "[$(get-date)]Update completed."
        Add-Content -force $log -value "`n`n[$(get-date)]Update completed."
    }#END: Function Get-Sysinternals